
Welcome to Helm! In this guide you’ll find everything you need to get started in Helm so you quickly forecast and manage your cash.
If you haven’t created an account yet, get started for free here.
Below you’ll find:
HOW TO SYNC / RESET YOUR ACCOUNTING DATA:
Step 1: Login into Helm
Step 2:
If it’s your first time in Helm you’ll be prompted to create a company to forecast. Fill out the required fields and click ‘Create Company’.
Note: If your an advisor with a firm, enter your client’s company info here (NOT your firm’s info)
Step 3:
Once a company is created you can connect your accounting system by selecting your accounting software from the list (QuickBooks, Xero, or Sage). From there you’ll be asked to sign into your accounting system and authorize Helm.
Step 4:
Once a company is created you enter the setup wizard which take you through a set of guided screens enabling you to configure your Helm setup exactly the way you want (This is the same step where you reach when you reset your company forecast). You have the ability to select a data timeframe, include or exclude accounts and review the forecast before creating the company.

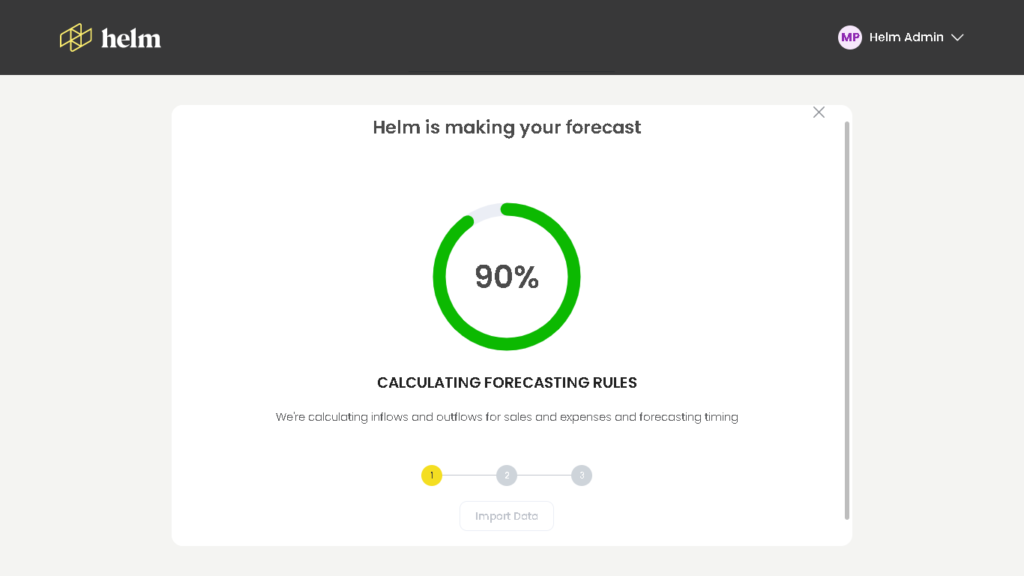

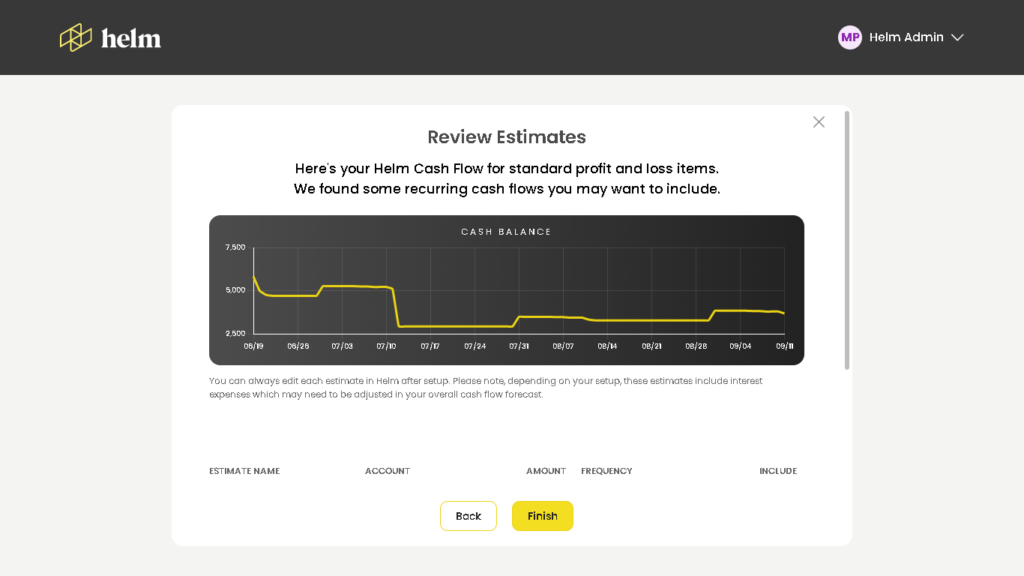
And that’s it! Helm will automatically start analyzing your data and creating a cash flow forecast. Depending on the size of the company this can take between 30 seconds and a few minutes.
Once complete you’ll be brought to the main Helm screen where you can view and edit your cash flow forecast.
Overview
The Helm Cash Flow Dashboard provides a comprehensive overview of your financial data and enables you to efficiently manage your cash flow. This feature tour will walk you through the key functionalities available on the dashboard.
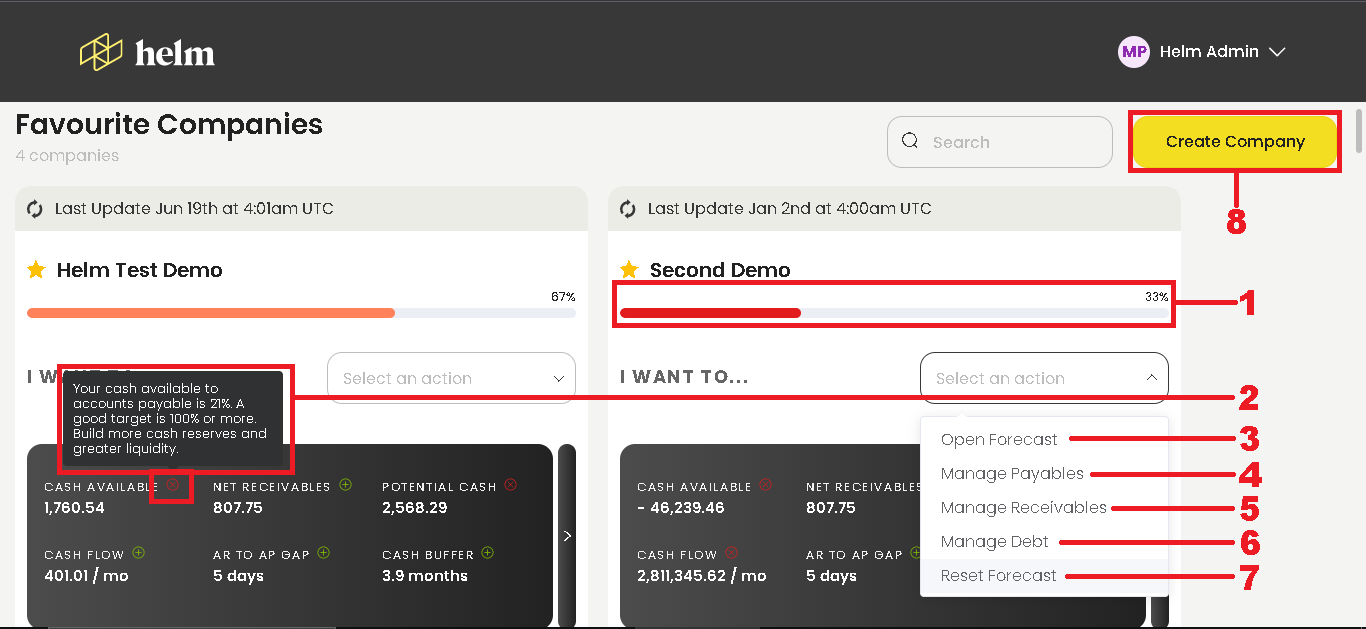
1. Health Score
Helm goes beyond basic cash flow management by providing important health scores for your company. The health score is a proprietary algorithm that derives a numeric representation of your company’s overall financial standing. (An ideal should be over 70%).
2. Health Metrics
An actionable way to manage your financial health is to use the Helm Health Metrics. By Clicking on the ⓘ pops out a bubble, A green icon shows a positive health score wheras a red icon shows a negative health score and a suggestion on what action can improve it along with the target score you should try to achieve.
3. Opening the Forecast
The forecast is a powerful tool in Helm that helps you project and analyze your future cash flow. By accessing the forecast feature, you can gain insights into your financial future and make informed decisions.
4. Managing Payables
Efficiently managing payables is crucial for maintaining healthy cash flow. Helm provides tools to help you track and report your payables, ensuring timely payments to suppliers and service providers.
5. Managing Receivables
Managing receivables effectively is essential for optimizing cash flow. Helm offers features to help you track and report outstanding payments from your customers or clients.
6. Managing Debt
Managing debt is a critical aspect of financial health. Helm provides tools to help you track and manage your debt obligations, allowing you to optimize your cash flow.
7. Reset Forecast
To get started, Helm allows you to create a new company within the cash flow tool. This feature streamlines the process of setting up and managing your financial data for all your companies or the client accounts you manage.
8. Creating a New Company
To get started, Helm allows you to create a new company within the cash flow tool. This feature streamlines the process of setting up and managing your financial data for all your companies or the client accounts you manage.
 Accessing manage payables from the dashboard.

Report builder features
The payables report builder displays a table of all bills due by the selected date. The table includes the following columns:
– Select / Deselect: Allows you to select multiple bills and edit the “Pay by” date. Or you may want to de-select a bill which will exclude it from this report (However note that this bill will still be factored in on your cash flow forecast)
– Hide/Show: Use this only to eliminate the bill from the cash flow forecast completely. If you change your mind later you may click on show bill within your cash flow forecast screen later.
– Set Payment Date to: You can also change the pay on date for all bills that have been selected in the report by performing the following actions:
– Graph: Upon making changes to the values in the table, you will in realtime be able to see the cash flow forecast change in the graph and this snapshot view helps you decide if this payables plan works.
– Generate Report: This button takes you to a next screen which helps you action on this Payables report.
– Download PDF: On this second screen that you see (After clicking generate report), you have the ability to download a PDF version of this payables plan that you just created.
– Send Report: This second screen also lets you send this plan to your customers.


Step 1: Navigate to the Helm Dashboard
From the cash flow forecast screen click the home button in the top left corner (yellow Helm logo).
This will bring you to the dashboard where you can view and edit your companies.
Step 2: Click create company
To add a company click create ‘Create Company’
Step 3: Enter company information
Fill out the required fields then click ‘Create Company’
Step 4: Sync accounting data
Once a company is created you can connect your accounting system by selecting your accounting software from the list (QuickBooks, Xero, or Sage). From there you’ll be asked to sign into your accounting system and authorize Helm.
And that’s it! Helm will automatically start analyzing your data and creating a cash flow forecast. Depending on the size of the company this can take between 30 seconds and a few minutes.
Once complete you’ll be brought to the cash flow forecast screen where you can view and edit your cash flow forecast.
Step 1: Open the company you want to edit
From the Helm Dashboard select the company you wish to edit
STEP 2: SELECT THE GEAR ICON IN THE TOP LEFT
Click the gear icon in the top left beside the company name, to open company settings.
Step 3: Edit Company
From here you can edit the company name, time zone and invite/edit/remove users. You can also disconnect your accounting system, set up the ability to make payments through Veem, and edit how forecasts are automatically created.
In Helm you have the option to add, edit, and remove users from a specific company or form your organization.
We’ll cover company specific settings first:
Step 1: Open company settings
Click the gear icon in the top left beside the company name, to open company settings.
Step 2: Select the users tab
From this tab you can invite users, remove users and modify whether or not a user can modify the forecast.
Editing organization users:
Step 1: Open organization settings
Click your profile icon in the top right corner from either the cash flow forecast screen or the dashboard.
OR
Step 2: Select ‘Organization Settings’
From the dropdown menu select ‘Organization Settings’
Step 3: Edit Organization Settings
From the organization settings menu you can change the name, add/edit/remove staff, delete companies, and view your billing and order history.
Step 1: Open organization settings
Click your profile icon in the top right corner from either the cash flow forecast screen or the dashboard.
OR
Step 2: Select ‘Organization Settings’
From the dropdown menu select ‘Organization Settings’
Step 3: Edit Organization Settings
From the organization settings menu select the ‘Billing’ tab then click ‘Cancel Subscription’.
Before diving into more specific features it’s a good idea to orientate ourselves in Helm.
Once you’ve setup your account and connected a company the first screen you’ll is the main cash flow view shown below:
In the top left corner you can see the current company, in our example case our company is ‘Sage Demo’. You can edit company specific settings by pressing the gear icon next to the company name.
Below the company name you’ll find the ‘Cash Balance’ graph. This graph shows your cash balance over the selected time period.
You can change the time period displayed by selecting an option in the top center of the screen. The screenshot below currently shows a 3 month forecast.
Below the ‘Cash Balance’ graph is the ‘Transactions’ graph.
This graph shows all upcoming inflows and outflows of cash for the selected time period. The size of the bar is proportional to the monetary value of the transaction, letting you quickly focus in on the most important transactions.
Bars below the zero line are cash outflows, bars above the zero line are cash inflows. You can drag and drop transactions to quickly see how a change in transaction date will affect cash flow.
In the top right you can edit your profile and organizational settings.
On the left hand side you’ll find tabs for managing, sources of cash, accounts receivable, accounts payable, editing your forecast, changing viewing options and testing scenarios.
From the menu on the left hand side click ‘Bank Accounts’ to open the tab.
Doing so will open the tab allowing you to edit, add and adjust sources of cash. Helm will automatically pull in accounts in your accounting software, but you can add other sources and choose to exclude accounts from your cash flow forecast.
HOW TO MANAGE ACCOUNTS RECEIVABLE IN HELM:
From the menu on the left click ‘Accounts Receivable’. This will open a tab allowing you to manage AR.
In this tab you can view all your AR, edit amounts and payment dates, choose whether to include or exclude them from a forecast, and change the colour of transactions on the graph.
You can view all AR sequentially, or group by contact by using the ‘Group By’ drop down menu.
You can choose to view you AR by their age or Average Days Receivable (ADR). ADR is calculated by Helm based on your historical data. It is the average time that a particular client has taken to pay you in the past.
You also have the ability to manually adjust dates.
Use the ‘Add Filters’ menu to view transactions that meet specific criteria. You may also search for individual invoice numbers.
From the menu on the left click ‘Accounts Payable. This will open a tab allowing you to manage AP.
In this tab you can view all your AP, edit amounts and payment dates, choose whether to include or exclude them from a forecast, and change the colour of transactions on the graph.
You can view all AP sequentially, or group by contact by using the ‘Group By’ drop down menu.
You can choose to view you AP by their age or Average Days Payable (ADP). ADP is calculated by Helm based on your historical data. It is the average time that you’ve taken to pay a vendor in the past. You also have the ability to manually adjust dates.
Use the ‘Add Filters’ menu to view transactions that meet specific criteria. You may also search for individual invoice numbers.
While Helm automatically creates forecasts you still have full control, and are free to tailor your forecast as much as you like.
From the menu of the left click ‘Forecasting Rules’. This will open the forecasting rules tab allowing you to edit, add and remove forecasted transactions.
You can edit amounts, date, and colour and choose which to include or exclude from your forecast.
You can choose to group transactions by account or view them sequentially. You may also add filters or search by name to find specific transactions.
Clicking ‘Create Rule’ allows you to add a new item to your forecast.
Name your rule, select account & company, select the date and if the transaction repeats, amount, and growth rate. Click ‘Save & Close’ to add your new rule to the forecast.
Helm has three different viewing options to choose from, allowing you to find the one that works best for you and your clients. To change the viewing option click ‘Views’ from the menu on the left hand side. You can swap between views at any point.
The default option ‘Cash Flow Graphs’ features a highly visual interface and a drag and drop interface great for making quick changes and seeing and communicating the impact quickly.
The ‘Transaction Detail’ view replaces the transaction graph on the bottom with a line-by-line view of all transactions.
You can edit the date range as well as export the transactions to a PDF or CSV file.
The ‘Cash Flow Summary’ view will be most familiar to those who have created cash flow forecasts in spreadsheets in the past. This view replaces the transactions graph with a daily, weekly, or monthly cash flow table.
You can export the table in a PDF or a CSV file.
Feel free to switch between any of the three views at any time!
Scenario planning allows you to test and plan for the future without making changes to your base case. You can create and compare as many scenarios as you like.
To create a new scenario click ‘Scenarios’ at the bottom of the menu on the left side. Then click ‘Add Scenario’.
Name your new scenario, give it a description and select a colour to differentiate from your base and other potential scenarios. Then click ‘Save & Close’ to create your new scenario.
You can change the scenarios(s) that are displayed by clicking ‘Views” and then the 3 dots next to the scenarios name(s). The cash balance graph will display your selected scenarios side-by-side.
Confirm you are editing the correct scenario by checking under the company name in the top left. The transaction graph default colour will also match the scenario colour.
Once you’ve confirmed you’re in the desired scenario you are free to make as many changes as you like in the ‘Bank Accounts’, ‘Accounts Receivable’, ‘Accounts Payable’, and ‘Forecasting Rules’ tabs.
Can’t find what you’re looking for, reach out here. We’re happy to help!